TAKING THE SOMATOTYPE PHOTO – PLEASE!!! KEEP YOUR CLOTHES ON!!
Somatotype originally required a nude photo. This was a big obstacle to research in this field and has practically brought it to a standstill. If you are assessing your own somatotype it’s alright to take a nude picture of yourself because you would be the only one seeing the picture. You can use a timer set‑up on your digital camera. If you have a good camera on your smart phone you can get a free app that will give you time to pose properly and you can set the number of shots it will take. The time interval can be set to allow you to pivot at the appropriate angles to take a front, back and side photo.
Nude somatotype photos should not be taken of a client. You can take an adequate somatotype photo as long as the subject is wearing FORM‑FITTING clothes: leotards, body‑suits, two piece swim suits for women, briefs or tight underwear for men.
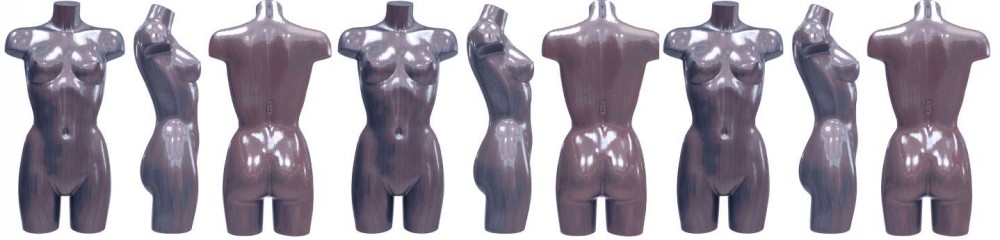
Here are some examples of the clothing that is acceptable. However, the pictures are NOT examples of properly posed somatotype photos. Correct posing will be discussed shortly.
Modest Somatotype Clothing (Male)
Modest Somatotype Clothing (female)
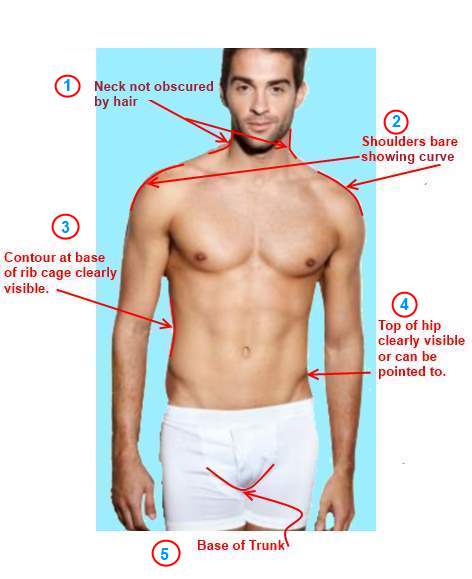
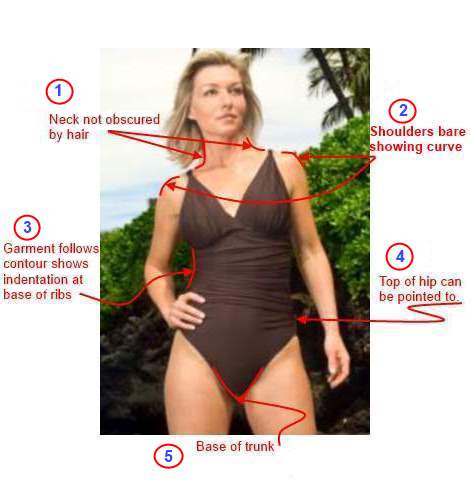
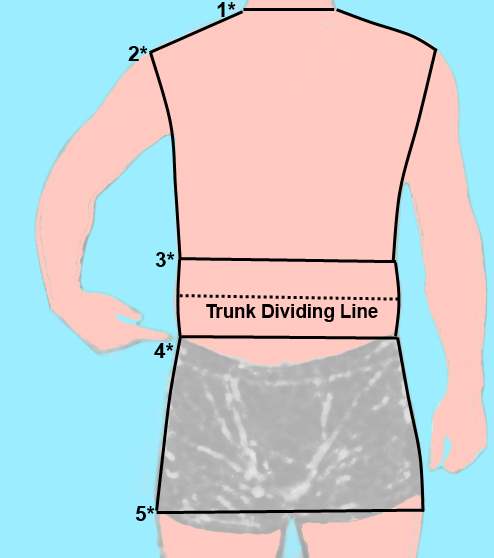
The word “trunk” is taken from the Latin word “truncus” and means to “cut off-mutilate” . If you cut off the head, arms, and legs, you have a truncated body or torso. Look again at the clothing examples and you will see that the markings are guides for defining the trunk. There are five of these points as numbered on the examples.
- Point where the neck connects with the trunk
- The points that bisect the curve of the shoulder
- Bottom of the rib cage
- Top of the pelvis
- “V” of the crotch that marks the bottom of the trunk. In a dorsal position (back, view) the sub-gluteal fold (bottom of buttocks) should be even with the base line defined by the “V”.
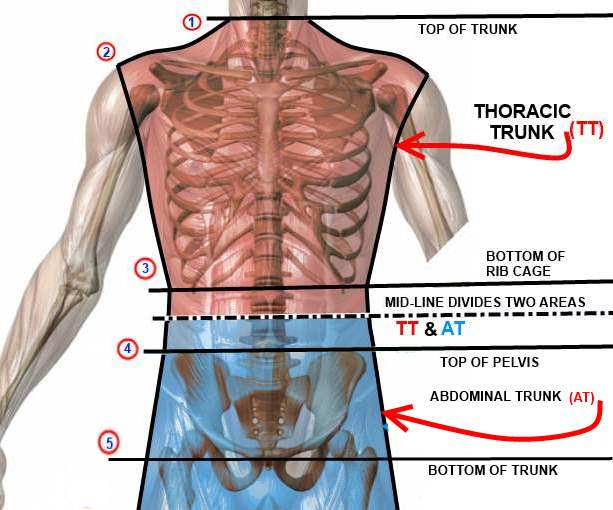
All of these markers reflect the skeletal structure underneath. The illustration below shows how these points map onto the skeleton.
In about half the cases, the skeletal markings for the Trunk Index will be clearly identifiable. The rest of the cases will need some kind of additional device to indicate the various points. Bodies with a lot of fat can be a problem. In those cases, you may need the subject to feel for the bottom of their rib cage and assist you in placing an adhesive mailing label as a pointer. You may also use a bandage or some other adhesive tape.
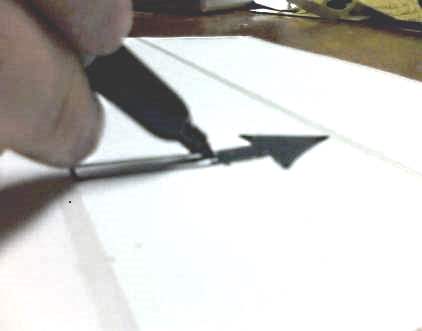
Draw Arrows on Adhesive Mailing Labels
You may ask the subject to point to the top of their hip while being photographed. Make sure they know the location of the top of their hip. The base of the trunk as defined by the crotch is usually visible especially if the subject is wearing form- fitting shorts. Occasionally, a drooping abdomen may hide the “V” crotch area that marks the base of the trunk. When the abdomen is drooping, a side picture may be necessary to get the correct orientation.
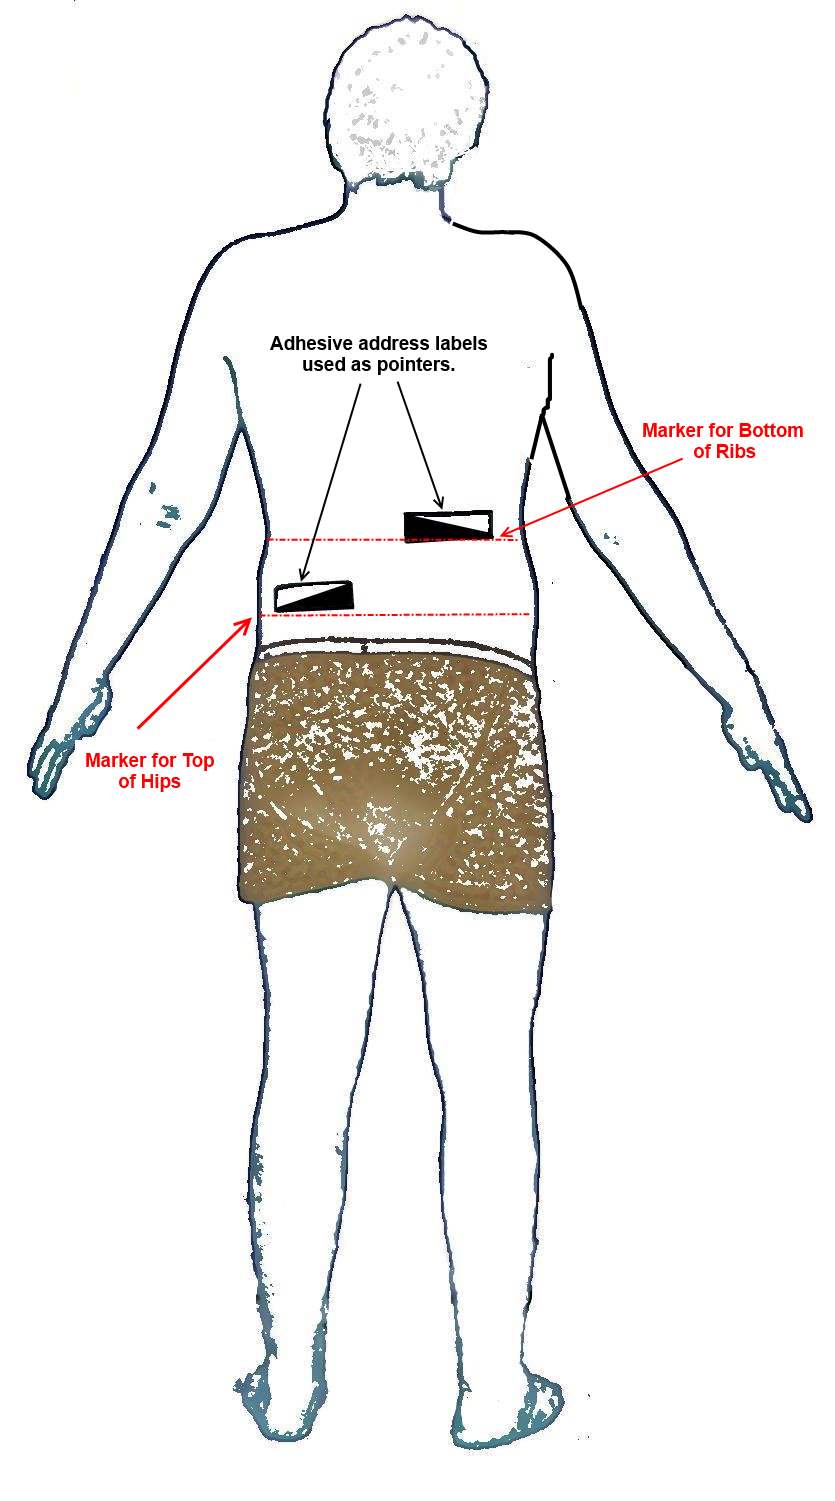
Adhesive Labels to Mark Obscured Point.
PROPER POSE FOR TAKING THE PHOTOGRAPH
- Make sure the subject’s hair is pinned back so it doesn’t cover up any of the shoulder or neck area.
- Lift chin up so that it doesn’t obscure the neck.
- Wear FORM FITTING clothes (illustrated at top of this page).
- Subject should use their index finger to clearly point out the top of their hip (pelvis, also known as the iliac crest.) Don’t push the finger into the flesh. After the correct spot is located move the finger outward so it is just pointing and NOT pushing. Lower the elbow so the shoulder isn’t overly hunched.
- The free arm should hang totally relaxed at the the side. Don’t make a fist. Don’t squeeze the arm against the body. Don’t hunch shoulders.
- Feet should be close together and not more than shoulder width.
NOTE VERY IMPORTANT: The function of the line marking the bottom of the rib cage and the line marking the top of the hip is to determine the critical Trunk Division line which is shown as a dash-dotted line and separates the Thoracic (upper) Trunk from the Abdominal (lower) Trunk. The area between the bottom of the rib cage and the top of the hips is kind of a no-man’s land that is divided equally between the two Trunk Sections. Make sure you don’t use either the top of the hip or bottom of the rib cage as the dividing line. The dividing line is exactly in between those two lines.
The subject should be 15-20 feet away from the camera. The person taking the picture should be kneeling so that the line of sight for the camera lens will be toward the subjects waist. This procedure should eliminate most of the lens distortion that results from being too close to the subject. The image may appear small but it is easy to enlarge the picture with any photo editing software.
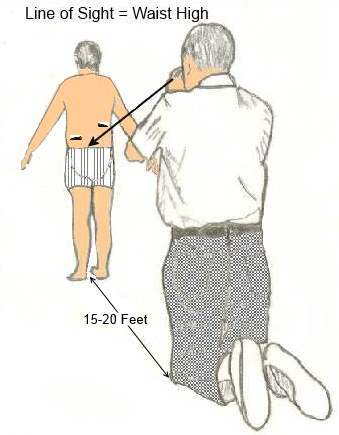
Line of sight directed toward bottom of the subjects trunk at a distance of 20 feet.
If you follow the above instructions you should end up with a photo like the example below. The lines that define the trunk and divide it into the Thoracic area (top) and the Abdominal area (bottom) are shown in this illustration.
Somagraph with lines defining the trunk areas.
As a reminder review the numbered points on the above somagraph with this previous list.
- Point where the neck connects with the trunk
- The points that bisect the curve of the shoulder
- Bottom of the rib cage
- Top of the pelvis (subject is pointing to the top of the pelvis)
- “V” of the crotch that marks the bottom of the trunk. In a dorsal position (back, view) the sub-gluteal fold (bottom of buttocks) should be even with the base line defined by the “V”.
Our next task is to find the area of the Thoracic Trunk and Abdominal Trunk. We are going to use a crude method that can accomplish this with a high degree of accuracy. You will need the following materials:
1. Tracing paper: Available at office supply stores or Amazon for under $10
2. Quadrille (Graph) Paper: Free Click. (http://incompetech.com/graphpaper/custom/10-1Grey.pdf ( NOTICE: if this link becomes inactive let me know)
Here are the steps to determining the area of the Thoracic and Abdominal Trunks.
1. Print out the somatotype photograph (somagraph). Draw the necessary lines that define the Thoracic (top) Trunk and the Abdominal (bottom ) Trunk.
2. Place the tracing paper over the photograph.(See Figure A)
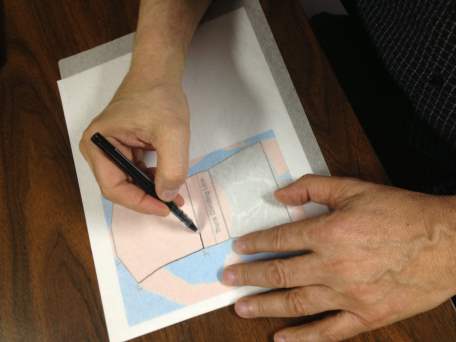
Fig.A -Tracing the trunk areas.
3. Copy the two trunk areas. (See Figure B below)
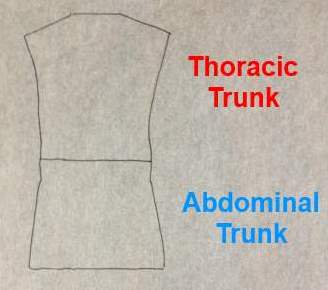
Fig. B Tracing of the two trunk areas.
4. Place the tracing over the graph paper. (See Figure C Below) You should be able to see the grid squares underneath the tracing.

Fig. C Tracing placed over the graph paper.
5. Take a photo of the tracing over the graph paper.
6. Import the picture from your digital camera or smart phone into a Digital Photo Editor.
7. Your job now is to count the squares in the Upper Trunk and then the squares in the Lower Trunk. You can do this by sectioning large areas of squares. See Figure D.
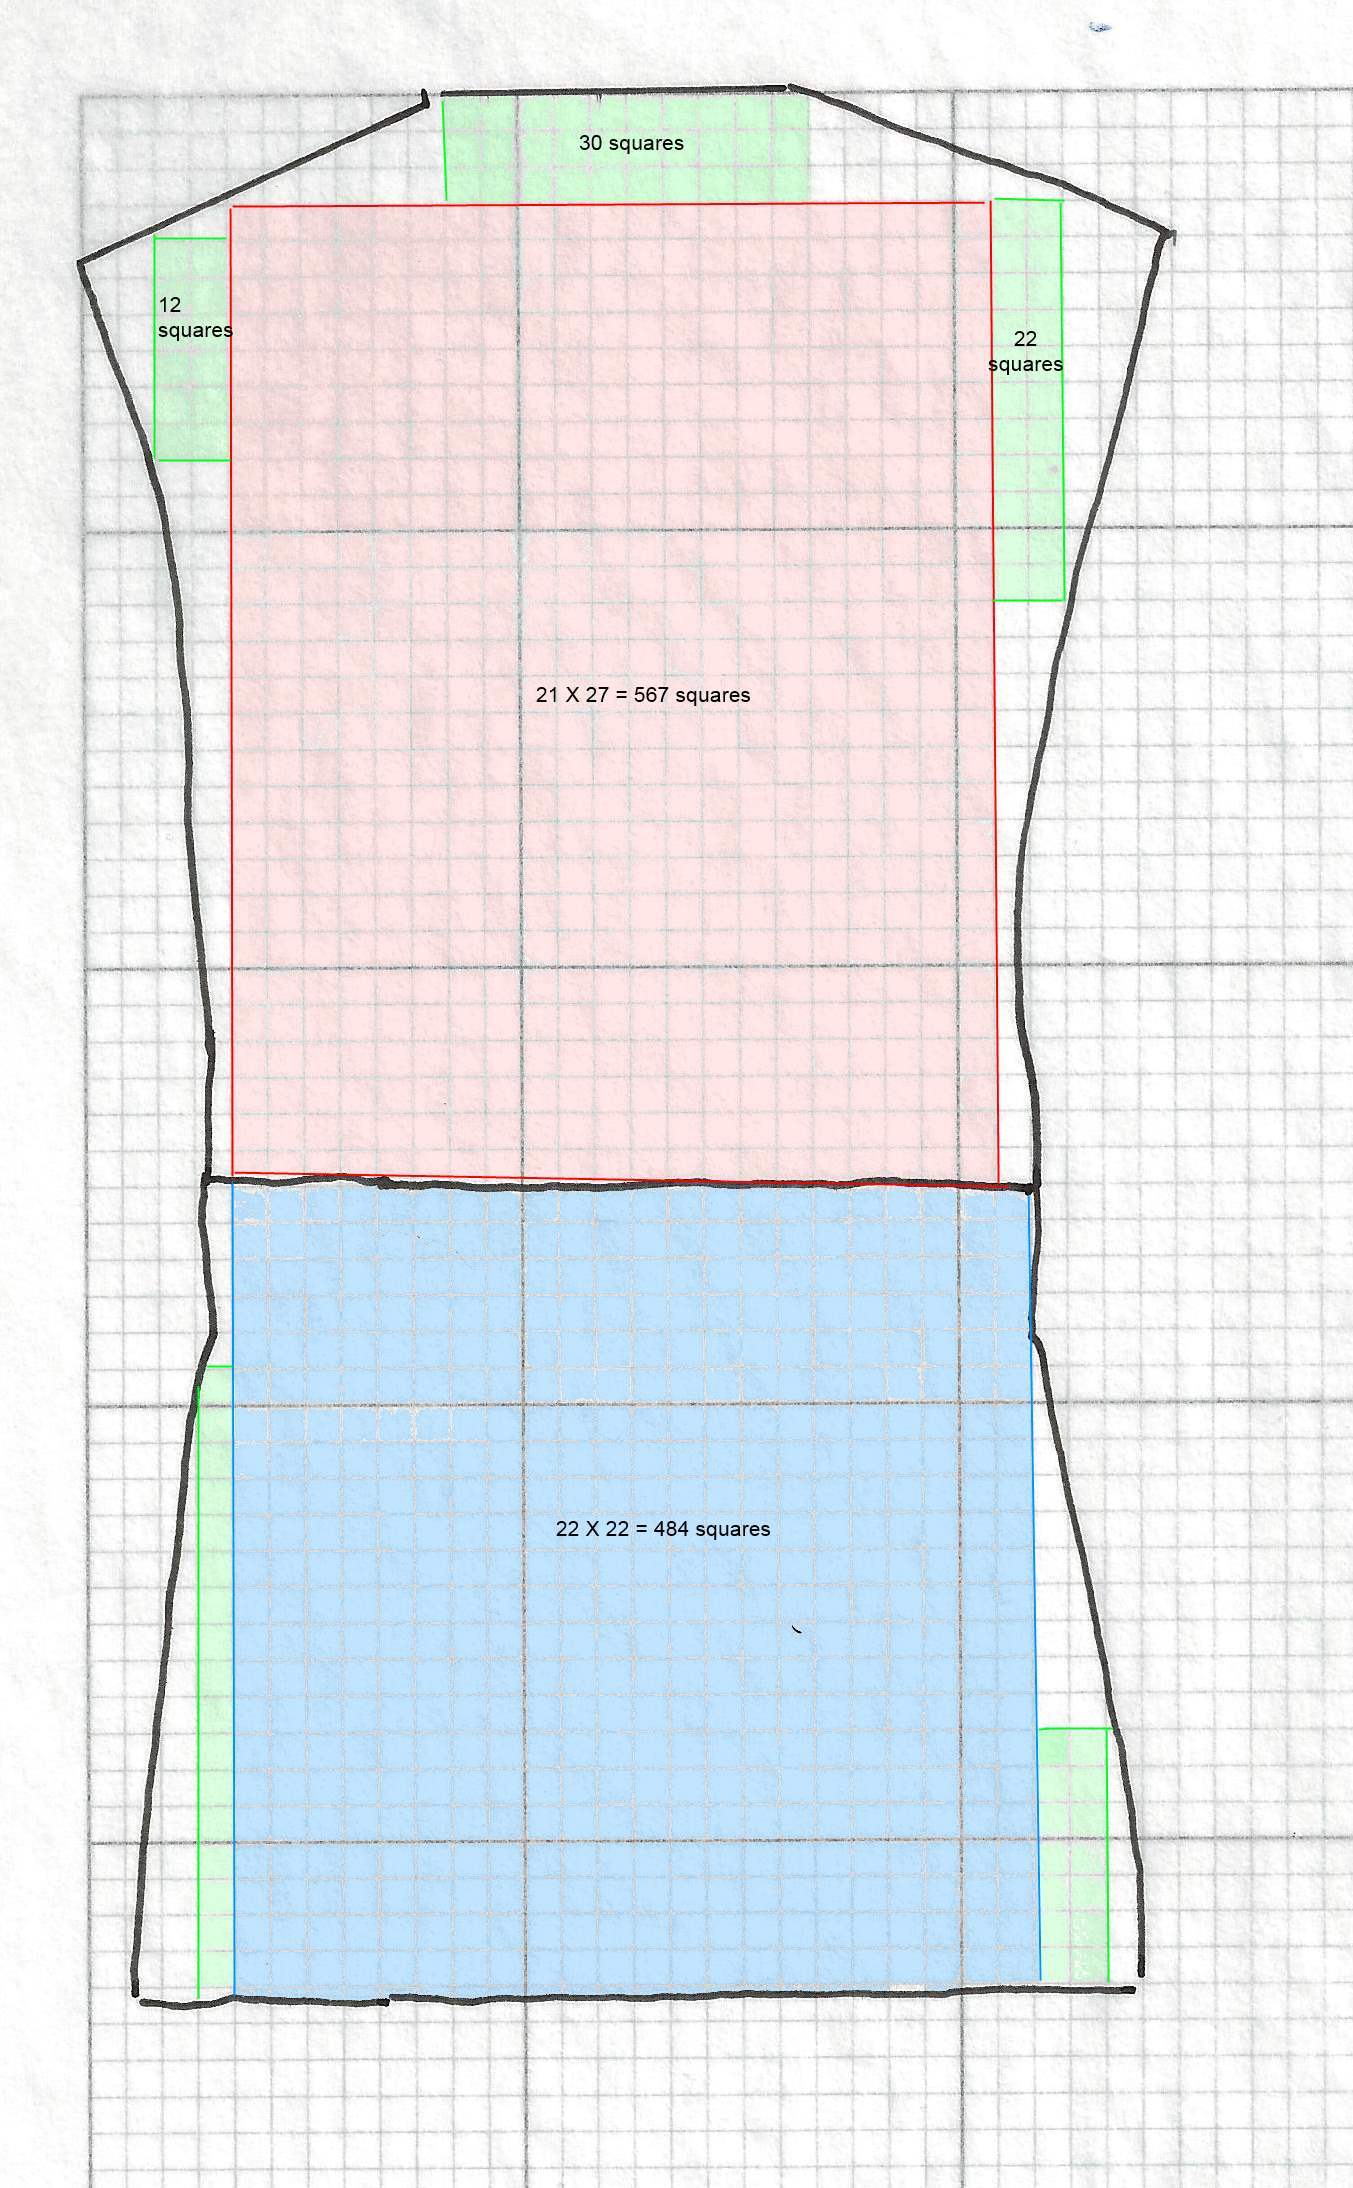
Fig. D Sectioned into easier areas to count squares.
8. The bits and pieces that are left over should be counted either as a half square (.5) or a full square. Your judgement will be adequate as long as you are consistent. See Figure E.

Fig. E Counting the Odds and Ends.
In this example there are 712 squares in the Thoracic Trunk and 550 squares in the Abdominal Trunk. When you divide 712 by 550 you get 1.2945 which you round up to 1.30. So the Trunk Index in this example is 1.30
USING A DIGITAL PLANIMETER
If you plan on doing a lot of somatotypes I would recommend purchasing a PDF prgoram like Nuance PDF PRO ® This program will allow you to convert a photo to the PDF format and then has measuring tools that allow you to measure irregular areas. All you have to do is click as many points around the perimeter of an area and it will calculate the area. There is also a program called SketchandCalc ® that is specifically a tool for measuring on screen areas.
Once you have the Trunk Index you are ready to go to the tables and determine the somatotype. GO
