“Somatotype. A quantification of the three primary components determining the morphological structure of an individual. Expressed as a series of three numerals, the first referring to endomorphy, the second to mesomorphy, the third to ectomorphy.”
This is the definition of “somatotype” as stated by the originator of the term in his book Atlas of Men (1954). page 337 Appendix 1 Glossary.
Notice he doesn’t say there are “three somatotypes” instead he says “there are three primary components”. These three components make up a somatotype and they need to be quantified (assigned to a scaled position numerically). All three components are represented in each individual somatotype. Failure to recognize this fact trivializes the complex interactions of the components depending on the degree to which each component is expressed in a somatotype.
Although many researchers have attempted to develop an objective method of classifying the human physique, Sheldon stands out as the pivotal researcher in this field even though his method is not widely used.
SHELDON’S METHOD
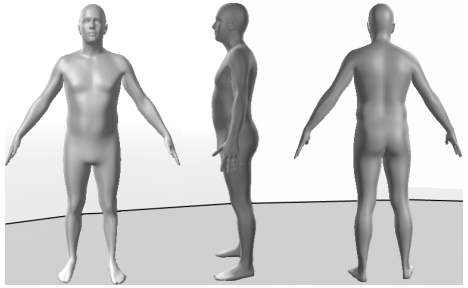
The method of somatotyping used on Mysomatotype.com is based on the work of William Sheldon. Before Sheldon there were general theories about the relationship between temperament and body-type going back to Hippocrates. Sheldon knew about the efforts of others, but chose to start from scratch to develop his method based on physical measurements that would facilitate scientific investigations that could be repeated by other researchers . When Sheldon began his research, body types were a vague concept with just a few general categories without any way of visualizing how the dimensions mixed by degrees with numerical values. Rather than imposing vague concepts gleaned from a small population of patients or acquaintances, Sheldon wanted to build on a foundation consisting of a large number of subjects. The initial population in his research consisted of 4,000 college students. He took photographs of each student from the front, side, and back. Special care was taken to control the type of camera, lighting, lens, and camera distance to avoid distortion.
Keep in mind Sheldon’s goal was not to impose his ideas on the data, but to let the data speak for itself. To this end he sorted out the photographs into whatever extremes became evident. He settled on three extreme types. Simply stated, the three extremes are described as being – Fat/Round – Muscular/Square -Thin/Linear. This schema was illustrated as a triangle of extremes with a coming together of the extremes into a balanced center. This is how Sheldon describes the process in his book, “The Varieties of Human Physique”
“To those who may wonder why three extremes were chosen, it should be pointed out that in a large random sample it is precisely three extremes which stand out. Repeated combing of the population for what might reasonably be called a fourth basic type of extreme variation simply yielded nothing at all.
We were not committed to find three first-order variants – and only three. It is indeed, fair to state that we rather expected to find more than three. We were initially reluctant to accept the conclusion that only three fundamentally different extremes can be isolated.”
NAMING THE EXTREMES
Sheldon used terms from embryology to name the various dimension that emerged from his extensive survey. There is a very important stage of embryonic development that occurs at three weeks from fertilization where the developing embryo splits into three distinct layers. The ectoderm (outermost) layer forms skin, nerves, brain, and sensory organs. The endoderm (innermost) layer forms the lining of the stomach, intestines and other internal organs associated with digestion. Sandwiched in between the outer and inner layers is the mesoderm which forms muscle and bone. When you observe enough human physiques it becomes clear that something happens at an early stage that structures the development of the organism with different rates of growth so that the organism takes on a distinct expression of the basic systems represented by these three layers.
Sheldon’s inclination to search out biological roots led him to use the vocabulary of embryology to name the general body types. Sheldon felt it would be appropriate to name the various body-type dimensions after the tissue layers that were most significantly connected with their dominant features. Endomorphs appear gut dominant. Mesomorphs are muscular. Ectomorphs are highly invested in nervous and cerebral features. This is not some wild leap. The stage of embryonic growth where this takes place is called “gastrulation” and is a significant development in the embryo that takes over the activity of growth and defines its direction.
Some try to minimize this connection, however, on a general level, Sheldon’s tying the three types to their developmental source accurately describe the characteristics of the various body-types. In fact, to Sheldon’s credit, his labels for the body-types remain in use today. Wherever somatotypes are discussed in scientific research, the words “endomorph”, “mesomorph”, and “ectomorph” are likely to be the terms that are used. Even those who have created competing systems of somatotyping use these three terms.
PUTTING NUMBERS TO THE NAMES
Sheldon wanted to do more than merely confirm the existence of certain components of physique. He wanted to produce a useful scientific tool for measuring the effects of these components. Therefore, a numeric value needed to be applied to each of the components. He chose a scale of seven degrees. Odd numbers are a good choice for this kind of scale, because it allows a central balance point. A verbal equivalent of his scale looks like this:
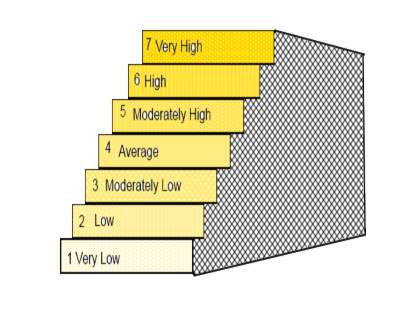
Working with somatotypes over time, Sheldon became so sensitive to the subtleties that it enabled him to expand this to a 13 point scale. 1, 1½, 2, 2½,3,3½… The final form for expressing a somatotype numerically is with three numbers, where the left number represents the degree of endomorphy, the middle number indicates the degree of mesomorphy, and the final or right number represents the degree of ectomorphy. An extreme endomorph is represented as a 7-1-1. An extreme mesomorph is represented as 1-7-1. And finally the numbers 1-1-7 represent an extreme ectomorph. A 4-4-4 would be a balanced somatotype with each of the three components being equally represented.
CHARTING SOMATOTYPES
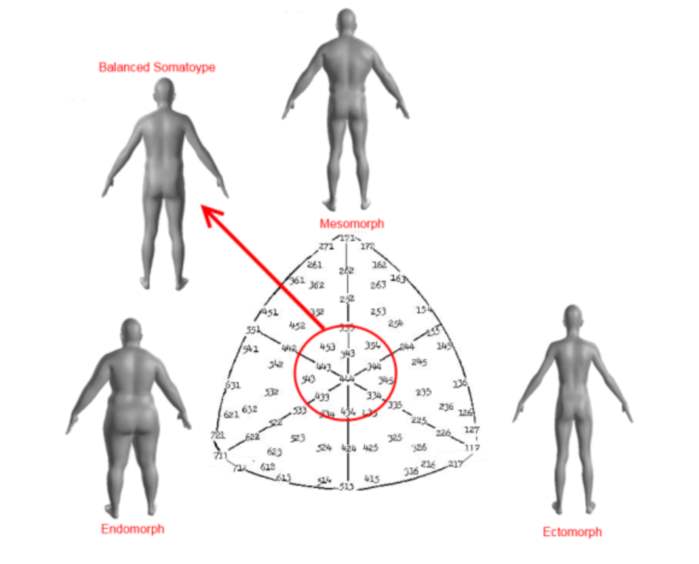
Another part of Sheldon’s work that persists is his chart of somatotypes. It is an attempt to aid in the visualization of the relationships between the various somatotypes. A tetrahedron would be the ideal way to view the relationships, but this is a serious challenge for the average person’s spatial abilities. Instead, he flattens it out into a curvilinear triangle, also referred to as a Reuleaux triangle . The figure below is how this is typically illustrated.

MAKING SOMATOTYPING OBJECTIVE
Originally, somatotyping could best be described as an art, skill, or technique that you had to “get good at.” This was discouraging to researchers. It was hard enough to put together an experiment that required nude photographs of the subjects, let alone dealing with the long learning-curve to be able to make accurate assessments that were basically educated guesses. Science is about replicating experiments and verifying the evidence collected. Since Sheldon and some of his close associates were the only ones skilled in these techniques, it is easy to see the danger of a conflict of interests. A somatotype that required interpretation might be weighted in favor of the desired experimental results.
Sheldon was not ignorant of the need to make somatotyping completely objective. Throughout his career he experimented with various direct physical measurements of a subject in addition to the photographs. Finally, around 1968, he published a paper answering criticisms of his methods.
(See discussion at http://www.innerexplorations.com/psytext/shel.htm)
The key to objectifying the somatotyping process is the Trunk Index, which is the ratio of the upper and lower torso areas. This measurement remains very constant throughout a person’s adult life, even with weight gain or loss. Once you know a person’s Trunk Index, height, weight, and age it is possible to determine which of nearly 1,800 possible somatotypes is a match.
OTHER METHODS
There is no exclusivity to the term “somatotype.” You could measure the human physique in any conceivable manner and decide to call it a somatotype. The most popular method used today is one developed by Barbara Honeyman Heath, a former associate of William Sheldon. The main difference between the Heath-Carter method and Sheldon’s has to do with a philosophical perspective about somatotypes. Sheldon believed the somatotype is relatively constant throughout an adult’s life. This view fit into Sheldon’s intent of determining a causal relationship between somatotype and temperament or personality. Conversely, the Heath-Carter method abandons that idea, preferring instead to describe the somatotype as a structure that can have wide variation over time. MySomatotype.com uses Sheldon’s method because, in addition to describing a person’s physical tendencies (athletics, health, and weight), it also encompasses mental characteristics (temperament and personality).
A FOURTH EXTREME
I have made an adjustment to Sheldon’s theory that changes the whole interpretive landscape of the somatotype. When assessing somatotype, MySomatotype.com adds a fourth index to the standard three. The additional index expresses the degree of balance between the three systems. When you look at the chart of somatotypes, it is clear that in addition to a somatotype’s location with reference to the three extremes (corners of the triangle), you also become aware of a somatotype’s location with reference to the center. This is the key to harmonizing Sheldon’s work with the many temperament theories based on four factors.
When somatotype is explained, it is presented as a very simple application of the somatotype dimensions. The result is that people are assigned to one of three possibilities. This is counter intuitive. Just three pieces of the pie is much too broad to be useful. And that’s where most people abandon the whole idea. So, let’s look at some possibilities for cutting up the pie to make it more useful.
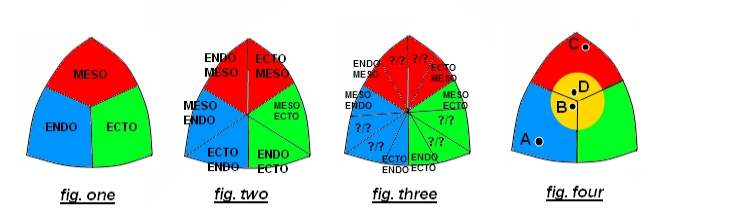
Fig. One shows the triangle cut up into the simplest division. This may be adequate as an introduction to somatotype but it doesn’t do justice to the wide variability that emerges from the continuous range of somatotype as each component is mixed with the other components. This chart leads to the stereotypical images of endomorphs as fat, mesomorphs as muscular, and ectomorphs as skinny.
Fig. Two shows a partially useful division of the triangle. It’s the traditional pie cut. It allows for thinking more about combinations of the three dimensions. Each section is divided into two groups.
- ENDOMORPHS: Ectomorphic/Endomorphs and Mesomorphic/ Endomorphs.
- MESOMORPHS: Endomorhic/Mesomorphs and Ectomorphic/Mesomorphs.
- ECTOMORPHS: Mesomorphic/Ectomorphs and Endomorphic/Ectomorphs.
But if you cut the pie by contiuing this strategy you end up with some pieces that are difficult to label as illustrated in Fig. Three.
The problem and the solution are illustrated in Fig. Four. Points A and B are in the Endomorphic section while points C and D are in the Mesomorphic section. But if you were asked which point is closest to B you would readily say point D. Point B has more of a similarity to D than to C. This highlights the importance of giving consideration to the middle of the pie.
Treating the middle as a dimension allows the addition of a fourth factor in calculating the effect somatotype has on temperament. No one has done this. My adjustment to the somatotype/temperament theory demands a second look at Sheldon’s theory.
We will address this next. See WHATS YOUR BODY TYPE
Dimensions
So glad you didn’t say somatotype is b*ll/sh*t